
Bitmap (also known as raster) and vector artworks are widely known in the screen printing industry for the use of graphic design projects. But there’s times when one or the other isn’t suitable for respective tasks. Our studio team at Innotex Transfers works with various vector file types to ensure our production team gets your transfers completed at a high standard. If you’re unfamiliar with vector files, you might be wondering what the difference is, why we use vector over bitmap, or what either of them are for a matter of fact. Our guide to working with vector files will take you through the whole process and even how to work with them when placing an order!
What is a bitmap file?
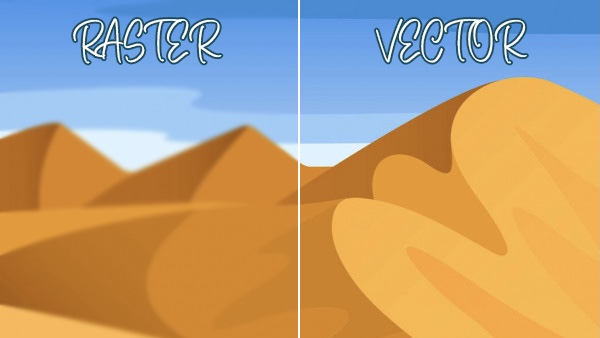
To start off, bitmap works with a tremendous amount of pixels to display an image on your screen. This refers to photographs or even digital artwork. The more pixels you have, the higher the quality will be (however, this will result in a larger file size). If you’ve worked with Photoshop before, you might have an idea why bitmap artwork isn’t used for something like a widely distributed logo. Though bitmap artwork looks great from afar, if you zoom in, you slowly start to uncover the individual pixels that make up the images, and soon enough, the image on display doesn’t look so smooth. This is the case with any bitmap artwork, whether there are 1,000 pixels or 10,000,000 pixels.
Bitmap artwork can be converted into several file types. This includes bmp, jpg, png, psd and gif. Files like jpg, png and gif are usually found on Google and can easily be placed in photoshop. However, you might notice on Google when images have numbers such as “105 x 232” or “1878 x 2134” – this is the sum for the amount of pixels an image contains, which also determines the quality of the image. Smaller image sizes are more prone to lower resolution when moving it over to edit on Photoshop, which is a big downfall, especially if it needs printing.
What is a vector file?
Vector artwork on the other hand, doesn’t make use of pixels and instead, works with path lines. This uses mathematical data to form lines using points. Through the use of vector files, images are easily editable, without having to use complex design skills to alter layouts, colours and sizing. Vector files have a high advantage for graphic design work since the formulas in vector images can be scaled to any size, big, small and even stretched without losing quality, unlike bitmap artwork.
Commonly used file types for vector graphics include ai, cdr, eps, pdf, svg. These file types are extremely effective in many ways, such as svg and its ability to retain small file sizes, the 2D graphics and bitmap features of eps files and even cdr’s editing and illustration tools. Though the need to convert vector files from illustrator files are for niche purposes, there are available platforms for whenever adobe software isn’t accessible and is imperative for printing designs.
Can bitmap and vector files work together?
In short, sometimes – but not for a design aspect. Simply because they’re too completely different types of data. However, if you’re wondering whether you can use a Photoshop (psd) and an Illustrator (ai) file together, that’s certainly possible in some circumstances. Let’s say you have an artwork that you’ve designed using Photoshop tools such as the drawing tool. The graphics that have been added to the file are displayed using pixels that don’t allow for a conversion into Illustrator, which works with path lines. But let’s say you’ve utilised solid tools like lines and shapes; these aren’t created through individual pixels, which means Illustrator has the option to convert the file into a smart object when moving it over.
So yes, there are times when bitmap and vector FILES work together, but if the design itself has been created using bitmap pixels, it’s not possible to turn pixels into path lines. If you’re thinking of placing a psd file into an ai file in the hopes it’s considered vectored, unfortunately it won’t format and will remain as a bitmap artwork, simply copied onto an ai file.
Outlining fonts in Adobe Illustrator
Certain printers require fonts to be outlined before starting the process. When working with vector art, any design that features fonts can be outlined using the tool in Adobe Illustrator. Fonts need to be outlined when there is licensing involved to ensure permissions are followed correctly. You might want to create a copy of your file before you do this; once a font has been outlined, it can’t be reverted. So be sure you have the original copy of the file before playing around with the font outline tool as there’s no coming back.
So what other benefits does outlining text have on vector art. Well, with vector projects, printing for ready-to-press can be a problem if you don’t outline fonts because the printer might not register it as part of a vector object (it can print incorrectly, which is why we recommend vector art over bitmap art in the first place). Another main benefit to outlining fonts is the shift between a typeface to a vector shape. In other words, the outline tool turns your fancy fonts into a permanent vector shape; this is why the process can’t be reversed.
Pros and cons of live tracing on vector files
Live (or image) tracing is standard practice when working with bitmap (or raster) artwork on a vector file. The whole purpose of live tracing is to convert pixels into path lines so it is compatible with documents such as ai, cdr etc. In order to successfully complete this process, there are two ways to go about it. The conversion can either be completed through auto-tracing or manual tracing (which is usually the go-to for experienced designers only as they find their skills create more accurate lines). Ironically, studies have shown that the spatial accuracy of the human hand is less accurate than that of a computer.
The advantages of live tracing make life a lot easier if you want a raster image to be displayed in different sizes (as we covered, vector art can be resized without losing quality). The great thing about live tracing is the ease if you’re not familiar with vector art. If you’ve been designing your artwork on psd files instead of ai, you’re not at a complete loss because the two applications work together. It can be a bit trickier if you use two completely different developers as the tools might require manual work to identify where the pixels are.
Going with automatic live tracing means the converted lines won’t be PERFECT, but they’ll still be at a high standard nonetheless. This is pretty much the best it can get – and that’s why we recommend you complete the entire artwork process on a vector file in the first place. But technology IS moving forward every day, so maybe that day will come. Manual tracing is quite time consuming and is generally not recommended if you’re new to vector software because it requires precision, so we recommend that you stick with the automatic tool as it does everything you need.
When do vector files work best?
It’s actually standard practice for professional companies to use vector artwork for their logos – here’s why. If you’re looking to get a logo printed for garments, you’re probably displaying that logo on other forms of advertising right? Whether that’s business cards, a website, print adverts, billboards, mobile apps or anything else, it’s likely your logo is going to feature on anything owned by the company. This is where vector files come in handy for something more than just convenience since different formats require various sizes – I’m sure your website and billboard wouldn’t have the same sizing right? So you need something that will allow you to scale your images to any size and keep that crisp quality, which is essentially what a vector file can give you.
If you’re into graphic design and don’t intend to advertise your designs in different forms, you don’t necessarily need to create a vector artwork even though it’s more convenient. Applications like Photoshop will be perfectly fine, even for photography – they can be converted into standard image files, but as mentioned before, the quality will reduce if a size INCREASE is needed (and editing won’t come as easy), so it’s best to always have the original psd file available.
Side note: If you require vinyl transfers from us, vector is no doubt the best file type. Our production and studio team work with vinyl cutting regularly, using computer applications to convert the path lines into cut lines (which can’t be done with bitmap), to create a print that will allow them to weed around the lines.
What does Innotex Transfers need to place my custom order?
Within the day to day business, we have various formats sent for transfer quotes. Our studio team at Innotex Transfers mainly works with ai files (Adobe Illustrator) and recommends that our clients send us their artwork through ai as well, since no conversion is required and if requested, it can be edited pretty easily. This allows the transfer process to start off smoothly without any delays in sending out orders.
Sending artwork in psd files (Adobe Photoshop) results in the inability to edit, resize and manipulate layouts to fit on our screens to help you make the most out of your transfer prints. Instead, sending artwork as an ai file will allow our studio team to finalise proofs and request permission from you to make changes to artwork in the event something needs altering before production begins, such as sizing and colour codes (check out our blog on Pantone references and CMYK codes for a quick guide).
Innotex Transfers work with specific screen sizes for transfer prints for optimised production, so it’s understandable when artwork is sent in sizes that won’t fit our screens. Details like that can easily be changed by our studio team without having to touch the artwork itself. However, more complex alterations such as colour codes and file formats tend to delay the quick lead time we promise in our quotes. The best way to get your transfers produced quickly and efficiently is to provide us with the following: Pantone references of your choice, the quantity you’d like us to print and the desired sizes for your prints.
How do I get in touch with Innotex Transfers?
Now that we’ve covered all aspects of working with vector files and placing an order with us, we hope this helps you get started with your artwork. If you’re interested in discussing an order or have any general queries, please don’t hesitate to call or email us!


How to Wash Printed T-shirts: Aftercare Instructions
Previously we’ve covered various topics surrounding printing on t-shirts. Some being avoiding dye migration and even managing the artwork itself before
Transfer Paper For Heat Press Machine
Transfer paper for a heat press machine is vital to ensure your print comes out in high quality, smooth finish.
A Beginner’s Guide to Clothing Labels
Are you a small business owner, or have you always wanted to start your own independent clothing brand? Imagine putting